WombatOAM inside EC2 instacnce
Perquisites
To run WombatOAM inside an EC2 instance you will need the following perquisites before launching the instance: - VPC - Subnet - Route Table - Internet Gateway - Security Group
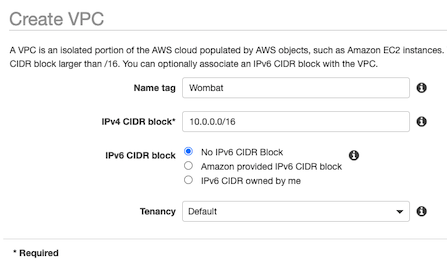
VPC Setup
First you have to setup a VPC. You can find it in the Services menu under Networking & Content Delivery. Press the Create VPC button and name it however you would like to. Recommended to use Wombat or WombatEC2. The IPv4 CIDR block is has to be set to: 10.0.0.0/16. Everything else is left with the default settings.
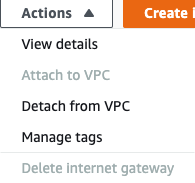
Internet Gateway Setup
Next step is to create the Internet Gateway. Go to the Internet Gateways and create a new one. Its name is up to you. We have to attach our newly created VPC to the Internet Gateway. Select the gateway click on Actions and press Attach to VPC. Pick the one you have created now.
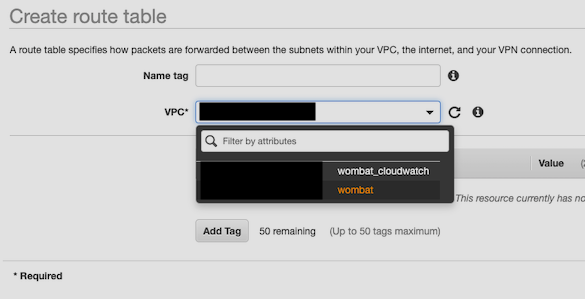
Route Table Setup
Next step is the Route table. In the Route table page click on the Create Route Table button, add a name to it and assign the VPC.
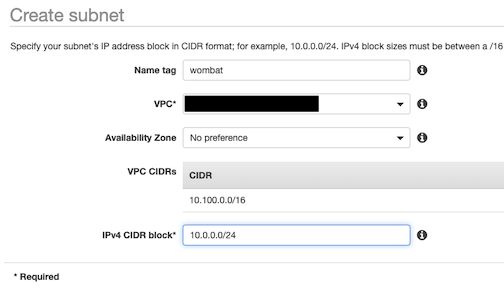
Subnet Setup
Now we have to create the subnet. In the Subnet page click on the Create Subnet and fill in the necessary fields. (Name, VPC, and IPv4 CIDR block which is has to be set to: 10.0.0.0/24).
Connection setup between Subnet & Route Table
Now the Route Table and the subnet association has to be established. Select the newly created subnet under Actions select Edit Route table association. Assign the route table that we have just created.
This whole setup was important in order to access Wombat in an internet browser.
Security Group Setup
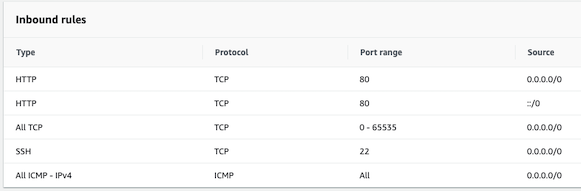
Now head over to EC2 under the Services menu. First and foremost, create a Security Group where we are going to configure the Inbound and Outbound rules. Select the Create Security Group and assign our VPC to it. Edit the Inbound rules according to this:
- Type: HTTP, Protocol: TCP, Port Range: 80, Source: 0.0.0.0/0
- Type: HTTP, Protocol: TCP, Port Range: 80, Source: ::/0
- Type: All TCP, Protocol: TCP, Port Range: 0 - 65535, Source: 0.0.0.0/0
- Type: SSH, Protocol: TCP, Port Range: 22, Source: 0.0.0.0/0
- Type: All ICMP - IPv4, Protocol: ICMP, Port Range: All, Source: 0.0.0.0/0
Edit the Outbound rules according to this:
- Type: All traffic, Protocol: All, Port Range: All, Source: 0.0.0.0/0
EC2 Instance Setup
Back to Instances.
Click on Launch Instance and go through the setup. The important part is the AIM, which is recommended to be an Ubuntu Server 18.04.

Instance type is up to you. Under the Configure instance page the Network should the VPC that we have created along with the subnet. Set the Auto-assign Public IP to Enabled. Storage and Tags can be configured to your preferences. In the Configure Security Group page select the one we have just created. After that click on Review and Launch and then Launch. Create or choose an existing key pair in order to ssh into the instance and hit Launch Instance. It takes some minutes to setup. While waiting open a terminal and when the instance is up and running enter the following command: (select the EC2 instance to see the details)
1 | |
If everything is setup correctly you should be inside the ec2. Run the following command to install Docker:
1 | |
Now head over to Dockerhub page for WombatOAM. Pull and start the docker image with these commands:
1 2 | |
WombatOAM will start automatically after the image pulling has been finished. Open a browser and copy the Public IPv4 address from the EC2 instance and paste it into the browser. WombatOAM should be available at that IP with port number 8080.